
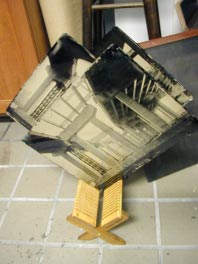
1. On the cutting of the plate
My plates start out as a coil of tin-plated iron- 75 pounds worth that arrives on the UPS truck. I roll it down to the shop and hang it on a spool that feeds across my cutting table.
The coil is cut down to plate sizes using the various patterns that fit each of my wet plate backs. The evolution of plate holders is another story, but right now I use two patterns for 11x14 holders, as well as “true dimension” 8x10 and 5x7 sizes.
The blank plates are stacked and moved up to the lab for japanning.
2. Japanning
Tintypes require a glossy black surface as the foundation for the collodion image. The ideal surface is smooth, highly reflective and without imperfections of any kind. It must also be chemically compatible with all the solutions and surface processing additives.
“Japan” is a hand-compounded black varnish based on various 19th century formulae. I cook it over a hot plate, mixing together a combination of asphaltic minerals, solvents and tree sap.
Coating the plates with the japan requires that they first be cleaned of any dirt or oils and then dried. The japan is brushed on thinly. The plates are then racked and baked in an oven to cure the varnish. Typically I will coat each plate four or five times to achieve the depth of blackness and gloss I’m looking for.
Completed plates are cooled and stored in a dust-free place. I used a “road rack” for taking plates into the field to minimize dust and protect the images in transit.
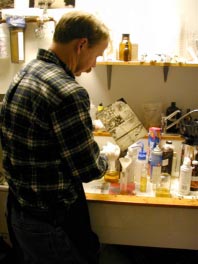
3. The Chemistry Show…
Big tins require large quantities of chemicals. They start with chemicals to make the emulsion (collodion), continue to the bath that renders the collodion light sensitive, then on to development, fixing, and finally washing and varnishing.
I prepare all the chemistry and baths in my lab and decant the necessary quantities for a day’s shooting. Most of the chemicals are explosive, carcinogenic, and extremely poisonous or all of the above, and I follow a number of rigorous safety precautions to minimize the chance of something unfortunate happening. This includes shooting in the field, where all rinses, etc. are captured and contained for neutralization and proper disposal. I am fortunate to have studied lab sciences extensively during my university days, and that experience has been a helpful prerequisite.
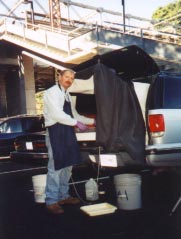
4. The Road Show
Because plate must remain wet throughout its light-sensitive cycle (15 – 20 minutes), the “action” is non-stop once the first pool of collodion expands across that plate’s
surface. This means shooting tins with a darkroom immediately at hand. Because I prefer to shoot big, this means taking the whole shooting match on the road.
The load out is a big deal. I like to think of it as “departments” so that I can breakdown the inventory into manageable parts. I always forget something- the trick is to make sure it’s something insignificant.
So I start with the lab department; a portable darkbox that fits into the back of my Chevy. It’s got all the chemistry, plus the myriad of trays, funnels, wiping rags etc. The darkroom is an extremely high tech refrigerator box with scrim of black rubber cloth.
The other departments are filled: camera, plates, gallon jugs of water, waste receptacles and so forth. I think the first time I took big tins on the road I spent an hour loading the truck and still forgot half of what I needed. Years later, I can get away in 20 to 25 minutes.
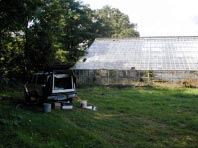
5. Site Selection
My years as a TV director taught me that pre-production, and most specifically location scouting, was the most important part of success on the road. Because wet plate is so labor-intensive, I scout my locations ahead of time.
Scouting not only picks the juicy stuff (like a really stinky mud hole), but also must address the logistics of vehicle parking, security (I still shoot alone, and in certain urban areas leaving my view camera unguarded even a hundred feet away can be problematic) as well as all the photographic issues.
I’m looking for a secure place off the traveled roadway where I can park in the shade, preferably with at least two different images from one vehicular positioning.
I think Garry Winogrand said it best when he spoke of getting into situations where he had a “high probability” of achieving successful images. Garry’s lively and spontaneous street images are a distant pole from the deliberative wet plate exposure, but his thought is right on target.
I seek places where it is more likely than not I’ll get something juicy coming up in the tray. If I’m shooting 35mm dry, 120 images on a contact sheet are a nice afternoon’s shoot. Over this past summer, April to November, I am happy with about 50 plates I produced. Wet plate is a slow process, and I can guarantee, guarantee, that when you rush it you will crash and burn.
6. The Set-Up
I pull out the big camera first and rough in the first image. Then it’s back to the truck to set up the lab and baths. The size of the dark box is about 3 feet by 2 feet, so manipulating plates becomes a tight ballet. Experience has been a pretty good choreographer, although I doubt I could shoot any larger than 11x14 in my present vehicle. I started out small (5x7) and just eased my up in size as my skill level grew.

7. Test Images
Collodion emulsion is primarily sensitive to ultraviolet light. Some day I’ll make the jump and buy myself a UV light meter to see if wet plate exposures can be predetermined like dry plates. However, even if that was to work, collodion provides other variables. The age of the emulsion, the heat of the day, humidity, shade, reflected UV from clouds (remember getting a sunburn on a cloudy day?) or bodies of water all play a part in moving wet plate exposure control from the calculated boundaries of the Zone System (sorry Ansel…) into the twilight zone of hunch, experience, and what the hell.
I make small test images on black glass, using a three stop “bracket”. In my work apron pocket was a stained and crappy index card with notes comparing successful past exposures to observed conditions. I lost it in August, and my images immediately got much better.
8. Control Junkie
So I control what I can control. I use the same chemistry. I keep my collodion about the same age. I use three f-stops (f22, f32, and f45 that is marked f64). Some of the “rules” of dry plate play somewhat- you can expose for the shadows and develop for the highlights up to a point because every plate is developed by inspection.
9. The Decisive 10 Minutes
I think it was Cartier-Bresson who shot the puddle jumper- so fleet of foot and yet just a sigh away from all that dirty water. The wet plate moment extends that feeling over an exciting (some would choose the word ‘frantic’) suite of time, and a balance of physical and mental coordination.
The big tin is removed from its rack and blown clean. I balance it in my left hand and pour the collodion bottle with my right. A good pour moves across the tin in one smooth circular motion, and when I work with glass (ambrotypes) good pours are frequent. Tin is hand cut. It bows and bends. The practiced skill becomes adjusting that moving wave front of collodion so that no “islands” remain. And did I mention that 10 – 15 seconds is the working time before the collodion sets up.
When you examine a finished image, note the thin blue ridge that has its apex at a corner. This is the hallmark of wet plate. The ridge aligns along the edges where the collodion slowed to drain- and point to the draining corner. When you see ridges encroaching into the image area, you have identified a pour that did not go very well.
Excess collodion is drained, and now under the flap of darkness I lower the tin into the silver bath. A long three minutes follows, during which time all developing bathes and rinses are charged and the plate holder is primed to receive the sensitized plate.
I lift the plate out of the silver bath and drain it well. Silver Nitrate solution is caustic and creates nasty permanent black stains on any organic material (like skin or the paint on the side of my Chevy). If you get it in your eyes, you go blind (God’s sweet irony- the liquid to capture exquisite light blinds the careless artist). I go through latex gloves by the case.
Now carefully, very carefully, I load the holder. The emulsion surface is as fragile as a butterfly’s wing. Lock ‘er up and head out to the camera to make the exposure. Tripping the shutter is sometimes an anticlimax.
Working time for a loaded holder is in the 10 minute range. This varies a great deal depending on the weather. The ticking clock limits how far I can walk between darkbox and camera- a couple of hundred yards.


10. And the Eureka Moment…
The plate is fixed with a Cyanide solution in what is doubtlessly the most magical moment of the entire enterprise.
The Eureka moment…
Suddenly the cool blue negative surface of the plate flashes away into warm brown tones and exquisite detail. When all the wet plate planets align- image, chemistry and exposure, I often cry aloud in awe as the final image emerges. Yes, it truly is magic.
11. Or the crying towel
And then there are the times when the Gods laugh at you. As you can infer, there are a hundred ways to ruin a plate. A bad day can mean hours of labor with nothing to show- or worse, a great image ruined by: a hair falling onto the plate, bugs, dust from passing automobiles, light leaks from wind blowing the dark cloth, hot weather over development, hot photographer over anxious, et cetera.
12. Temporary Holding of Images
The fixed plate must be rinsed briefly (cyanide is also caustic) and then stored for the trip back to the lab. The emulsion is coated with a wetting agent and then returned to the plate box.
I shoot two or three plates of a set-up. Each plate is its own thing- there are no “negatives” for my tins, so if I want to adjust the exposure, I must do so on the next plate. When I am really pleased with an image, I’ll make a couple tins. When I am vexed by an image, I make a couple of tins. When things are going well I keep shooting. When it’s all going to shit, I keep shooting. Which leads to the end-of-day bipolar experience of riding home on cloud nine with a plate box full of success, or cursing all the way to the vodka. But you know exactly where you stand- hero, goat, or usually something in between.
13. Wrap to the next location
All items must be drained, siphoned down and stowed for travel. Sloshing buckets are sealed up. The vehicle is repacked and I shove off for the next location. Two set-ups makes for a full day, though I have done three or four in summer months when the days are long.
14. Home, James…
Plates must receive additional washing and finishing. This includes a copious water rinse, and the fine but rarely discussed art of emulsion surface cleansing. During field processing, chemical artifacts may deposit on the emulsion surface. These artifacts are not permanent, and may be removed with very light finger pressure or the soft dab of a wet cotton ball. Surface cleaning can change the contrast of an image, and I have often taken a “C” picture up to a “B” with judicious use of a wet index finger. I’ve also taken an “A” to an “F” by slipping up.
The backside of the plate must also be cleaned thoroughly.
15. Rack
Wet plates dry in a rack overnight. Their appearance changes, and they appear two or three stops overexposed. These “in-the-bright” tins have fragile emulsion surface and than easily be scratched, or pick up all sorts of fingerprints. To preserve the image-on-tin, a layer of Sandarac varnish is applied and baked onto its surface.
16. The Sweet Smell of Success
The dry tin is heated to body temperature over an enclosed flame. As the varnish is alcohol-based, it is quite flammable so fire precautions are necessary. Sandarac varnish is applied to the emulsion surface in a style quite similar to pouring

collodion. However, the specific gravity of the varnish is quite different (sort of gin versus half and half) so manipulating it is not the same. The varnish must be given time to penetrate into the surface of the image before being drained off, otherwise the final finish may be mottled with non-glossy “flat” spots.
Varnish is drained off the tin, and it is returned to the heat to set. It is important to blot excess varnish off the edges of the plate, otherwise unsightly ridges form that may detract from the glossy finish. The varnished plate is racked overnight in open air.
That smell of success comes from Lavender Oil that is added to the Sandarac to provide gloss and flexibility.